Massive Dual Jolt
I came across this old aftermarket PS1 DualShock controller and it has some hilarious features so I thought I'd post a teardown of it here.
 |
| The Analogue Controller Plus Dual Jolt |
So it looks just like a standard aftermarket controller with bit of a weird design but that was kind of normal back when this was made. Actually the build quality is fine. Nice strong plastic. Feels like you could hammer nails with this thing. And most importantly after all these years it still works. There is no manufacturer name anywhere, just the controller name: "Analogue Controller Plus, Dual Jolt". I guess jolt is better than shock? Searching for Ebay listings seems to indicate that this was sold at least under Joytech brand with silver color. Also one unbranded bright red one was for sale. Now I'm bit sad mine is only grey.
 |
| Back of the controller |
Nothing special on the back. Just made in China text with CE mark. Most likely China Export, not Conformité Européenne.
 |
| Trigger buttons |
The trigger buttons are quite strange. Just stacked small buttons. I guess they took the inspiration from the original PS1 "dogbone" controller.
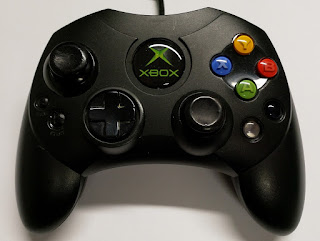
And now the most important part of this controller. It is freaking massive. It just dwarfs the original PS1 DualShock. We are in the original XBOX "Duke" controller territory here:
 |
| Dual Jolt on top, tiny DualShock at the bottom |
It's not uncomfortable to hold but I have to wonder why they made it so big. Maybe to sell better? Bigger is better? Lets look inside to see if there is any real reason to make this thing so massive. Maybe it has the most powerful vibration motors ever created?
 |
| Screws removed |
Back and front are held together with 7 screws. All same size. After the screws have been removed the back cover can be lifted. Some care must be taken with the vibration motors.
 |
| Back cover removed |
And inside is bit of a dissapointment. Nothing special. Motors look pretty standard. Also the construction is what you'd expect from aftermarket controller. Sharp fiber glass edges on PCB, glob top controller circuit and somewhat unclean soldering.
 |
| Back cover with lower trigger buttons |
Back cover still has the lower triggers attached to it with a plastic collars that are held in place with single screws.
 |
| Lower triggers disassembled |
I removed the lower triggers for better cleaning. Screws are different size than the back cover screws.
 |
| The main PCBs |
Next it looks like the analog stick PCB needs to be removed. It is held with a single screw. Same size as the screws holding the trigger assemblies.
 |
| Analog stick PCB |
When the screw is removed the analog stick assembly can be gently bent upwards. It is still attached to the main PCB with stiff ribbon cable.
 |
| Analog stick assembly freed |
The analog stick caps can be removed by just pulling. Looks like they are standard PS1 DualShock caps with thin hole for mounting. I think I'll replace those. The originals weren't totally worn out but they already had sticky layer on top the caps from degrading rubbery coating.
 |
| Caps removed |
Then I guess next thing is to remove the main PCB. Looks like it is held with couple of screws. Those were different size than any of the previous screws.
 |
| Main PCB screws |
The main PCB would still not budge. Turns out there was another surprise screw hiding behind the ribbon cable of one of the trigger assemblies. Same size as rest of the main PCB screws.
 |
| Surprise screw |
Lifting the main PCB reveals the conductive pads and buttons.
 |
| Front cover with buttons in place |
Nothing really special. I guess they could have user single conductive pad for the action buttons. Then I started wondering where are the conductive pads for the three center buttons. Turns out they are somewhat permanently attached to the main PCB.
 |
| Conductive pads for the three center buttons |
 |
| Mounting of the conductive pads |
The center buttons (select, start, analog mode selection) were working fine so I didn't remove the silicone membranes because it looked like they might break quite easily.
 |
| Front buttons |
Rest of the buttons and membranes can be removed without any difficulty. Looks like the D-pad membrane is ripped off from original DualShock. Strange that they didn't use the action buttons membrane from the original also but instead used those single button thingies.
 |
| Trigger button assembly |
For the sake of completeness I decided to disassemble the trigger buttons also. They are attached to the main PCB with stiff ribbon cable.
 |
| Back of the trigger button assembly |
As per usual everything is just clipped together and fairly easy to unclip. Just don't use excessive force.
 |
| Trigger button PCB |
The trigger button PCB is just as you would expect it to be.
 |
| Trigger button assemblies disassembled |
The membranes for the trigger buttons also look like they're copied from an original PS1 controller.
 |
| Crust on the main PCB |
The PCBs were really clean. Contacts looked like they were used hardly at all. Only strange thing was that there was some crust at the center of the D-pad contacts. This is of course the pivot point for the D-pad itself. I cleaned the crust and didn't see any damage on the PCB. I wonder if this is just laquer from the PCB that has been slowly eaten away by D-pad movements. I think I'll protect the area with some tape to prevent further damage.
 |
| Cleaned and reassembled |
I washed all the plastic parts with soap and water. Cleaned up really nicely although it was not so dirty to begin with. Reassembly was not too difficult. The vibration motors are bit fiddly. The mounting slots are on the back of the controller and it is not easy to put them into place once you have assembled the front part. Also had to be really careful to route the vibration motor leads so that the wouldn't get crushed.
I eventually did not change the analog stick caps. It seems that normal PS1 caps do not fit. They sit too low so the cap will scrape against the analog stick base. I was however able to remove most of the stickiness from the original caps by just washing them with soap and water. Hopefully they don't get sticky again too soon.
I guess thats it. At the end I was surprised how comfortable this controller is. It's a nice litt... huge PS1 3rd party controller. Maybe now I have to collect rest of the colors.

Comments
Post a Comment