Sega Megadrive 3-button controller cleaning
Today I'll be cleaning original Sega Megadrive (Genesis) 3-button controller. I got this in non-working condition, but decided to clean it before even testing. I thought I'd do this one with before/after style for some of the steps.
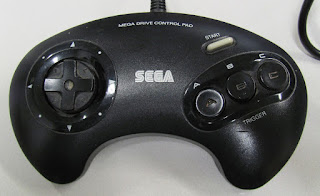 Front before cleaning.
 Front after cleaning.
 Back of the controller. There are six screws to be removed. All the same size. Be careful when opening old controllers. The screws are tight and the plastic already brittle. Use minimum force.
 I said be careful. This will be pain to repair.
 Used some superglue after cleaning, but I'm pretty sure this will not hold.
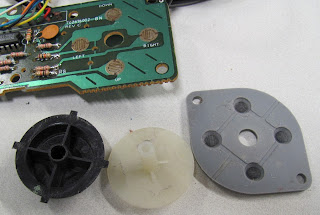
 Once the screws are removed you can just lift the back cover. Here the first interesting part is that the D-pad membrane is actually on the back of the unit. The D-pad moves the white plastic part which pivots on pedestal on the back cover. The white plastic then presses the membrane. You can see how much white dust there is around the pivot point. That is plastic ground from the white plastic part.
 Closeup of the assembly. Everything is held together with friction so you can just pull the two pieces apart.
 Back to disassembly. After removing the cable from the retention posts you can just lift the PCB out of the way. Front cover has only the buttons and membranes for A, B, C and Start.
 Buttons and membranes before cleaning.
 Removed D-pad assembly, membrane and PCB before cleaning.
 All the washable parts before cleaning. Again to the soap and water they will go.
 The loose parts after cleaning.
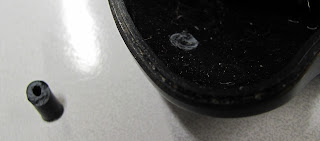
 Sadly one of the button membranes was almost broken. I think this is from one of action buttons that saw the most use. The button membranes are interchangeable so this will go the Start button now.
 D-pad contacts before cleaning. Lots of gunk from the membrane. Some scrubbing with isopropyl alcohol.
 Contacts after cleaning.
 Button contacts before cleaning. I guess B button had the broken membrane.
 Button contacts and front of the PCB after cleaning. Still some marks but I don't want to overdo the cleaning in order not break anything.
 Everything cleaned and assembled. Only back cover is missing. The tricky parts in reassembly are the D-pad and cable retention. For D-pad you just have to rotate it with the white plastic part until the D-pad notches align with the holes in the front cover. The cable has to go as shown in the picture. Otherwise it will block back cover plastic posts. Also be careful when screwing everything back together. The plastic is still brittle and you can break the screw posts by over tightening the screws.
 For testing I used Mayflash Megadrive to USB adapter and Windows game controller settings panel. I also tested some games with Super Retro Trio. Sadly I don't own real Megadrive anymore. Testing revealed that the controller is working but the membranes are too far gone. Especially the D-pad has trouble registering button presses. Also the Start button which now has the broken membrane is really bad. It seems quite difficult to source new silicone membranes for Megadrive controllers. Dragonbox is selling them but price is 5 euros. I don't think I will order them anytime soon. The original Megadrive controller is not so great to begin with, so putting another 5 euros to this seems like waste of money. Maybe in the future.


Comments
Post a Comment