Posts

Showing posts from May, 2019

Naki wireless Playstation 1 controller

Image
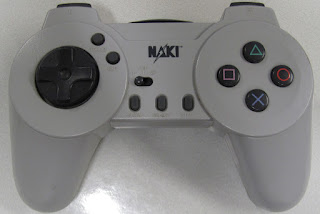
Today I'll be taking a look at an old wireless controller for PS1. This uses infrared for communications. Thankfully nowadays we have much better wireless solutions. I tested the controller and it works kind of randomly. Sometimes button presses are registered and sometimes not. I'm hoping its only dirty contacts or pads and not the IR part that is giving problems. Front before cleaning. Quite sturdy controller but still feels cheap. There is 1P/OFF/2P switch which can be used to select to which output the receiver sends the control inputs. I think this was originally sold in bundles with two controllers and one receiver. I have only one controller. The IR transmitter lens. The IR receiver. This has two plugs because it can handle two pads at the same time. Back before cleaning. Battery compartment. Looks clean. Usually these are filled with gunk from leaked batteries but this one was in pristine condition. Eight screws hold the controller together. Al

Cleaning original NES controller and Power Grip

Image
Purchased cheap original NES controller in the same lot as the 3-button Megadrive controller in last post. https://strangegamepads.blogspot.com/2019/05/sega-megadrive-3-button-controller.html This was also sold as not fully functional. Since this is by far the easiest controller to open and clean I decided to do just that before even testing it. Front before cleaning. Not terribly dirty. Back before cleaning. Some dirt and lots of scratches. Opening original NES controller is really easy. There are six screw on the back. All same size. Just remove those. Be careful when opening old controllers. The plastic is brittle so turn the screws gently. Oh crap. Applied too much force when opening one of the screws. Once the screws are removed you can just lift up the back cover. After undoing the cable retention you can just lift up the PCB. Be careful not to snap any wires. The front cover has the D-pad and button membranes. Everything can just be lifted up. There are gu

Sega Megadrive 3-button controller cleaning

Image
Today I'll be cleaning original Sega Megadrive (Genesis) 3-button controller. I got this in non-working condition, but decided to clean it before even testing. I thought I'd do this one with before/after style for some of the steps. Front before cleaning. Front after cleaning. Back of the controller. There are six screws to be removed. All the same size. Be careful when opening old controllers. The screws are tight and the plastic already brittle. Use minimum force. I said be careful. This will be pain to repair. Used some superglue after cleaning, but I'm pretty sure this will not hold. Once the screws are removed you can just lift the back cover. Here the first interesting part is that the D-pad membrane is actually on the back of the unit. The D-pad moves the white plastic part which pivots on pedestal on the back cover. The white plastic then presses the membrane. You can see how much white dust there is around the pivot point. That is plastic groun