Cleaning original NES controller and Power Grip
Purchased cheap original NES controller in the same lot as the 3-button Megadrive controller in last post.
https://strangegamepads.blogspot.com/2019/05/sega-megadrive-3-button-controller.html
This was also sold as not fully functional. Since this is by far the easiest controller to open and clean I decided to do just that before even testing it.
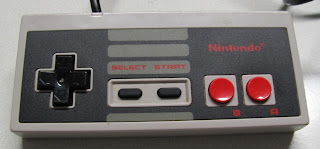 Front before cleaning. Not terribly dirty.
 Back before cleaning. Some dirt and lots of scratches.
 Opening original NES controller is really easy. There are six screw on the back. All same size. Just remove those. Be careful when opening old controllers. The plastic is brittle so turn the screws gently.
 Oh crap. Applied too much force when opening one of the screws.
 Once the screws are removed you can just lift up the back cover.
 After undoing the cable retention you can just lift up the PCB. Be careful not to snap any wires.
 The front cover has the D-pad and button membranes. Everything can just be lifted up. There are guiding holes and notches so you don't have to remember how everything goes back together. These silicone pads are really dirty. I'm guessing this is the cause of the problems.
 All the washable parts. To the sink they go with soap and water.
 Front and back cover after cleaning. They cleaned up quite nicely. I didn't do anything to the scratches at the bottom of controller. You could sand them down, but I don't see the point. In my opinion old hardware doesn't have to look brand new. Most important for me is that it works and it is clean.
 Silicone pads, buttons and D-pad after cleaning. The pads cleaned up quite nicely. They also still feel relatively springy so I'm guessing they'll work just fine.
 PCB after gently cleaning with isopropyl alcohol. Those black parts are carbon and they are part of the PCB so when cleaning make sure not to rub them too hard. They are the parts that complete the circuit with the silicone pad when button is pressed and thus button press is registered. So if you scrub too hard and damage the carbon contacts on the PCB, the controller will not work anymore.
 Attempt to superglue the broken plastic screw post in place. Again pretty sure this will not hold.
 After putting back the D-pad, buttons and silicone membranes you can just put back the PCB. There are guiding posts on the front cover that line up with the holes on the PCB. And of course I managed to snap off one those also when cleaning. You really have to be careful with old plastic. The cable retention has to go back the way it was.
 Everything back in place. I tested with few games using Super Retro Trio and the controller works just fine. The silicone membranes still have some life left to them so this will be nice addition to controller collection. But it feels like this is not the most ergonomic controller. Wonder if we could fix that.
 Behold the lumps of rubber also known as Power Grip.
 Power Grip installed. Not really sure if they add any ergonomics. But I got them for cheap so couldn't resist
https://strangegamepads.blogspot.com/2019/05/sega-megadrive-3-button-controller.html
This was also sold as not fully functional. Since this is by far the easiest controller to open and clean I decided to do just that before even testing it.


Comments
Post a Comment